Saturday, August 8, 2015

Festive Collections- Onam


Filigree Continues....with ethnic jewellery

Brands : Fimo classic & Kato clay


Jumkhas- Faux coral


Minimalism with elegance-  Soutache ear rings


Palakkamala (Kerala traditional Necklace) inspired pattern

Palakka mala in precious metal, the real inspiration.


Its the most popular pattern in Kerala, the South Indian state. One of the must in our jewel box. I believe I could show maximum possible justice to the design. Instead of doing a choker with plenty of "palakka charms " I only made the pendant to make it more vivid. Spacer beads with intricate work also fully handmade in poly clay (Kato).

Peacock Jumkha Handmade without mold


Yellow - Green Embroidery Jumkha


Ethnic Gold Jewelry Inspired Pendant Necklace


Another version of Handmade Peacock


Soutache Inspired Pendant


To purchase visit our FB page and leave a message .

Venera Collections on FB

Share your views please :)
Thank you So much...

Wednesday, July 29, 2015

Accidental Beauty- Story of a Mokume gane necklace


             This is a necklace I made without having a pattern in my mind. What I wanna try is just to entertain myself by :MOKUME GANE " technique. Other than that I should not had any specific plan or idea.        


           First I made few round beads n long beads out of the mini mokume gane block. Since mind was blank I left them as it is for two days , day , night, even during sleep time and doing routine work try to conceive an idea. I needed it (the necklace)  to have a FOCAL point, what should be it... thoughts thoughts and only thoughts going on. Once in such time I happened to read my online horoscope. I am a Piscean born by the ides  march.  

          The symbol of 2 fish one upward n one downward inspired me suddenly. But planning went with only one fish. 

      The color scheme chosen "Analogous"- ie, adjacent colors in color wheel like blue, green, yellow and red also present in beads already made. So the fish should be more eye catching, the color Orange was absent in color palate of analogous scheme.

        The basic shape roughly figured with white sculpey original clay on that spiral cane of yellow -orange tone applied as fish scales - fringes - tail parts. Hence my vibrant fish got ready to go.

                  Next attempted to make some more beads to satisfy the length. For this part made a handful of tiny nugget or pebble beads (which do not have a symmetry in shape) in Yellow, orange and an earthen tone to neutralize the other colors. They are arranged in three  lightly twisted raws with the fish at one end then stopping y long mokume beads.


       The clasp is beaded toggle one that too handmade.  :)  I got many appreciation for this from many people which ultimately made me smiled out of satisfaction of doing something with PC.


Thanks for reading, see you


Friday, July 24, 2015

Many in One....

                         
 Onam is the state festival of  Kerala a state in India, from where I am hailing from. It celebrates for ten days in the remembrance of  the king "Mahabali" as per our mythology. We love wear our traditional out fits for such days.
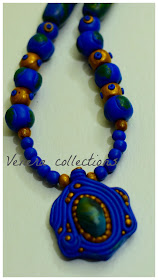
So last day I planned to make an ethnic necklace with matching ear rings. Here's what I made. I do not ever want to make an ordinary piece hence I adopted few techniques for this.
Requisites : Fimo blue , Kato gold.

Filigree n faux stone Pendant : Pendant is my favourit part in the set. Base cut from a blue thick piece by a pentagon shape cutter. Hand made oval faux stone placed in the center of the cut shape. Few tiny gold balls surrounding the center. Next aimed to make blue strings (I don't have an extruder yet managed to make evenly by hand) they placed around in some specific patterns along with some golden balls to fill gaps among the curves. This particular focal very much resembling to "Soutache" as it is done as some what inspired by a Russian artist - Anna Oriona's vedio tutorials.


Cane : A simple flower cane is used to adore the blue beads. The cane is not exaggerated though it sinks with blue bead to lessen  the density of intense blue. I made a mini cane with skinner blend of blue n gold clays for the purpose.

Natasha Beads with a twist : The scrap after caning presented in the form of 1 inch long cylinder beads both side with a technique called natasha beads. I just twisted them gently so the pattern flowing all over the beads.

Dotted golden beads / blue beads: Its simple applique work. Gold beads have blue dots n blue beads have dual tone dots.

Size of beads : They are not having an even size, but evenly arranged. Nearing to focal bead tiny handmade poly clay beads used to get maximum attraction. Same way at the end too tiny beads are strung along.

Matching Ear rings : Though they do not possessed  exactly similar matching with pendant in its simpler way.

Color : It would remind u a dancing peacock.


And I am absolutely happy and excited to show you the finished set.


Saturday, June 27, 2015

Making Own Textures


 Here is a little technique of creating texture sheets for your poly clay project.I do not had any scrap clay, hence I used some soft clay of sculpey. Take clay as much as you need size of the texture. For being first trial I thought to make a small sheet with a small ball of conditioned clay.
(Though picture quality is not that good, it may help you)


You can use anything to make impressions on clay like different shaped beads, cereals, leaves. flowers, tooth prick, whatever things you got will add variety of patterns.


Now we gonna roll the clay little thick either with roller or by pasta machine. Spray some water over clay which prevents sticking together.Take the desired 'tool' and press gently on the clay sheet. But the impression should be deep enough to have an embossing on our piece of work. Use a tooth prick to pick beads and to hold easily. (Simply insert the tip into bead hole). 

Here , with a small flower bead I made a floral pattern, added leaves and stem by just tall - short strokes.


I love roses, I had some roses and leaves I made early for a neck set. Now my hands tried on them. 


I finished like this,  then turn the oven on. It baked at 130 degree celcius for 15 minutes .


Yes, its working....

A pendant with a textured bail is the out come of approximate one hour work and tried "sutton's slice" method, I say as the first trial for using texture on clay some what I succeed.. Though its not a perfect piece at all.

Its fast as well as easy... D.I.Y....


Thanks for reading.

Wednesday, May 13, 2015

Jumkas - The Traditional Indian Ear Rings Tutorial I

JUMKAS

 Jumkhas are traditional ear rings form for Indians. Every Indian women love to have at least one set of jumkha in her jewel box no matter whether it is made out of gold , silver, terracotta, paper, clay or anything. Now a days non metal jumkhas become very popular as it is affordable and can have many in numbers to match with our costumes :-) It has a wide range of designs too .

The dome make these ear rings distinct from other type of dangling ear rings. It can either be conical or bell or half of round hollow bead or like a prism in shapes. The designs are endless according to the talent and imaginations of artists.
Earlier it was available in a form like the domes attached to studs. Now people uses ear hooks and hoops. The dome adorns with filigree, stones, kundans, pearls,tiny beads etc to get more catchy and elegant looks.
Jumkha Mold
Polymer clay is a wonderful medium to make jumkhas. I look at with lot of envy and admiration towards other artists jumkha designs until as myself could not make one. I haven't gone to a teacher to learn how to make jumkhas but tried myself watching a youtube vedio on making terracotta (natural clay) jumkha. First time me tried to make the dome on a scoop in the baby food packet. I applied some baby powder on the convex part of the scoop for not to stick the clay onto the scoop. But unfortunately when I take it off the dome was deformed also happened to get lot of finger prints.
This leads to the purchase of a jumkha mold usually people use it for making quilled / teracotta jumkhas. Now it seems its getting there to almost success which makes me obsessive as well as delighted. Its actually a process of correcting through trial and error.

I have seen many beginners asking for free jumkha tutorials in some Facebook groups. So I have a plan to pass just an idea. Of course , not sure whether it is the 'scientific way' to create them, But hopefully you will get a spark from this tut, I'm grateful if so.

How To Make Them?

Here I gonna share how I did simple cane jumkhas, similarly you can try plain or single color too.

Materials:

  1. Clay / Round Cane (Fimo proffessional \ kato\premo)
  2. Eye pins / Head pins
  3. Hoops / Ear hooks
  4. Beads (store bought or made out of clay) 
  5. Bead caps or spacer beads (optional)

Tools:

  1. Mold
  2. Craft Knife
  3. Round Nose Plier
  4. Wire cutter

Steps To Follow:


Making Domes-
  1. Clean your hands ,work surface and tools with wet wipes,then with tissue paper thoroughly. Cut two equal  pieces from the cane approx 1 cm each. On the other hand make a bead wrapped in thin slices of cane and cut it into halves. ( Exactly as what we do to make a cane bead) . Unless you use a cane, cut two equal size circles from a thick sheet of clay
  2. Apply some water or oil all over the concave side of mold. Place the cane or clay. Press well with a finger, check whether clay moves easily without any grip. If it sticks to mold take it out and apply little more water or oil. 
  3. Then again dip your finger or ball tool in water and make a dip in the centre of the clay and move around to make the dome. Trim edges in level . Make a bead hole exactly in the centre. Now you take it out; gently wipe the water not harming the shape. 
  4. Bake these domes at 130 degree celcius for 15 to 20 minutes. Mine is thin and light if your domes are thicker in size bake accordingly. Always check manufacturer's note on clay pack.

Assembling-


Now you can sand and polish them. Once they dry well its ready to assemble. These are not studded jumkhas so use ear tags or hoops as per your choice. 
Made few pair of domes
  • Slide the dome, bead cap (if any), and a bead through a head pin or eye pin. Bend the wire very close the bead at 90 degrees towards out again bend little up from the first bend to opposite direction to form a loop. You should trim any excess length of wire. Attach to an ear wire. Similarly do the pair too. 

  •  For hoops, straighten the lock at the one end of hoops not the eye ; then slide some beads of your choice (seed beads, faceted beads, gunguroos anything ) and the dome prepared now again same number of beads to look even. 
  • Bend the edge again with round nose plier to lock with the eye loop. Tada..... we have completed it in easy steps.
 I say it is economical to make small small jumkhas for practising because it consumes a good amount of clay. See here some designs made following the said method with different canes.

Other patterns from my collection and face book page.
https://www.facebook.com/Projjwaljewellery

Enjoy....

Tuesday, April 21, 2015

Making an Ombre Necklace


Ombre

           Ombre means the tones of colour that graduating from light to dark. The word originated from French word ombrer means 'to shade'. It gives a particular beauty to jewelry we gonna make. Today I will show you how to make ombre beads with polymer clay.
If you have pasta machine its much easier enough to create a skinner blend sheet and there by ombre beads.  Follow the steps to do it with your roller pin.

Steps :


1) Take two colors of clay as you wish. We can get the effect more nicely if u select analogous colors. Complimentary colors will end up in shades of brown only. Any way you can  choose any dark color with white, or red- yellow, blue- yellow, pink- brown, pink- black, black- yellow etc. I am giving you some examples only.

2) Condition them individually and thoroughly.

3) Make long drop shape with each of the conditioned clay.

4) Place them together to section them into  four to six parts.


5) Mix the colors in each section individually as one log of clay would be thin and other log would be fat at both ends. At middle both the clay colors would be in equal quantity.

6) So now you will get four to six balls of clay with a smooth transition of colors.


This is what called ombre shades. Now you can make beads out of it.  Here me used Blue an Gold colors and pebble beads (irregular shape like rock) made out of each ball. The blue ball was little big I cut a portion of blue and made six beads out of it in the real color. You can make some beads with both the colors which will show exactly what colors merged together. In this case I can add some Gold beads too nearing the clasp.  This necklace I made for a seven years girl at this much could meet the required length for her.

Look at the picture above for a reference. (Later I post how to make this kind of pendant in the picture)

The choice is yours. I am giving you some hints as soon as I go ahead, also it is a record of my learning process because me into one of the polymer newbies.... Love to share with you too...


Good luck for claying :) :)


Friday, April 10, 2015

Conditioning without a Pasta Machine

Hi all... How are you doing?
What's upto your creations?

Oh don't have a pasta machine, your fist pains...
Worry not... I have cool idea.. !! Happy ?

Conditioning is the process of making clay pliable and ready to create. Unless you condition nicely your product's strength n durability affected to a great extend. It may break or crumble even if you cured properly.

A tip for today :

      As you know pasta machine helps to condition easily without much our physical effort. But for the beginners they may hesitate to invest more for their clay crafts. So here I tell you how do it bit quickly..

                                                          *********

Take the amount of clay to be conditioned single color (or more colors if you want another color)

Chop them into tiny bits.

Gather all the bits n press together with your hands.

Roll with your non sticky roller. ( a branded acrylic roller preffered )

Fold or gather the clay , roll it again for 5-10 times or until they well incorporated.

Make a long log , fold it to half and then twist it as seen in the picture below

Repeat until smooth n sculptable.

Try this....


                                                   **************

It may not be an evolutionary invention. But my simple and humble trick I thought to share with you as it really help you well...


                      Thanks dear readers

                      Catch you Later..


Monday, April 6, 2015

Size Charts


          Very important while making a jewellery the length n size should fit to the one whom it made for matters of gender and age especially. It may vary slightly depending on short or tall, robust or lean the person is.

Measure your bracelet size
         Here I bring together the info about the standard length of necklaces  and bracelets. I hope this willguide you to vapourise your doubts! But  keep in mind its better if you can measure them individually go for it.

 Size of bracelet or a necklace measures excluding the clasp and  extension chain if attached. The proper size of bracelet calculated by  measuring the widest part of your fist by holding your hands as if you  wear a closed bangle.


Refer the chart below:

NECKLACE LENGTH (In Inches)

Women:

Collar                                                             13"
Choker                                                           16"
Princes                                                           18"
(Just below collar bone) 
Matinee                                                         20" to 24"
(About at or below Neckline)  
Opera                                                            28" to 34"
(Below Chest) 
Lariat                                                             45" Plus

Men:

Choker                                                       18"
Medium                                                     19" to 23"
Large                                                          24" plus

Babies/Toddlers:

Small                                                       10"                                
Medium                                                   12"                                  
Large                                                       14"

Children:

Small                                                      14"                               
Medium                                                  16"                                                        
Large                                                      18"


BRACELET LENGTH

Women:

Small                                                   6" to 7"
Medium                                               7.5" to 8"
Large                                                   8.5" to 9"

Men:

Small                                                8" to 9"
Medium                                            9.5" to 10"
Large                                                10.5" to 11"

New Born                                         4"
Babies                                               4.5" to 5.5"
Toddlers                                           5.75" to 6"
Children                                           6.5" to 7"

Note : Consider adding an extension chain for kids as they grow very fast.


                                                         Take care buddies...

(Google images Courtesy)

Friday, April 3, 2015

Basics of Beading + Assembling I : A simple floating necklace.

                        Beginners specially invited.....

I hope this post will assist you to be a self taught artists or those who can't go to a jewellery making teacher too.
Crimp beads

Learn it yourself, Do it yourself.


Materials
1) Beads(Here I shown you beads made of scrap clay)
2)Tiger tail wire
3) Crimp beads  
4) Jump rings
5) Clasp

Tools
1) Round / Flat nose pliers
2)Wire Cutter


Cut Tiger tail wire according to the length you required . For this you have to use wire cutting plier.
You should remember to cut few extra inches apart from the required length of necklace. Slide 2 or three crimp beads and a jump ring to the wire.

Beading


                              The crimp beads holds the beads/ fastener in wire from falling loosen. Bring it to about 2 inches of the end of wire. bend it little and slide again through the crimp beads. Now this end part has a loop and jump ring is there in the loop. Press the crimp beads in position with a flat nose plier. (Refer the Picture). Cut off excess wire.
Types of clasps

We plan a floating necklace.
Slide one crimp bead again and a bead (poly clay or store bought) again 2 crimp beads.
ie each bead should place in between 2 crimp beads. Repeat the process until you satisfied.

Now we wanna arrange beads in an equal distance in the wire. This is not a completely beaded necklace, but in between beads the wire is visible in the gaps. But in a little distance the wire wouldn't be noticed so as to call it a floating or illusion necklace. Its desirable to leave about 2cms gap. Find wherever to staple beads. Note the places and press a crimp bead then bring the polymer clay bead as much as close to the pressed crimp followed by another crimp. This to pressed very closely to polymer clay beads. Then leave 2Centimeters gap press crimps both side of polymer bead. Repeat until you finish.

Again as we did at the beginning slide 2 or 3 crimp beads , one jump ring and close wire through crimps forming a loop. Cut off excess wire.
Its ready to attach a clasp now. Open the jump ring and attach clasp through the beading hole. Close it tight.
Note : when you open a jump ring use pliers. Always do open to side to side. (See the picture below)


See how to open a jump ring
Ahh...... we finished..It looks like:
As you like you can add any number layers to the necklace, or else you can staple more than one beads at a place..Add a pendant etc etc... I'm leaving it upto your creativity. Many designs you can make with similar technique.

Here's some of my other designs;


     I hope you will send me yours.....


     Happy Easter to all in advance...