Thursday, July 19, 2018

ORGANIC BEADS - DIY #13


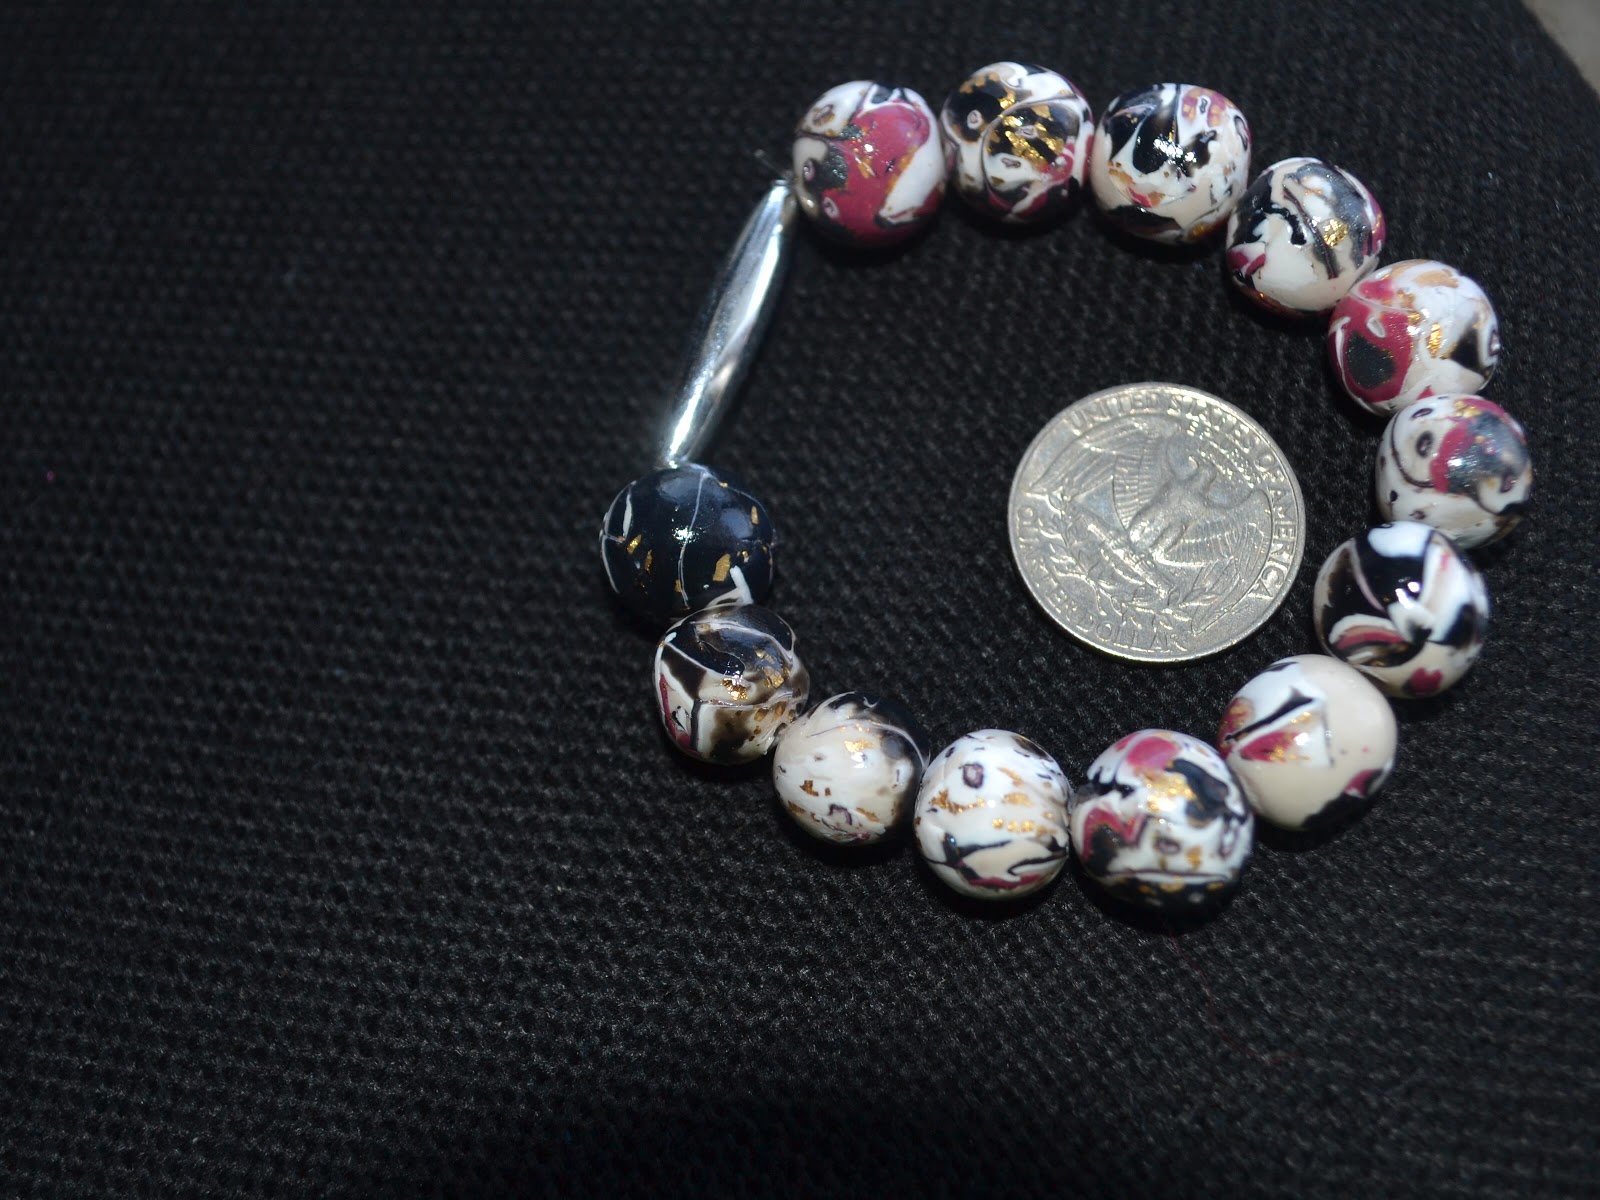
FAUX LAVA BEADS & FAUX CORAL STICKS - NUGGETS

Polymer clay is a wonderful medium, you can imitate almost anything in the universe . Last week I have experimented again with Faux lava beads and two different shaped faux corals. A couple of years ago I posted a blog post on Lava beads. This time a video demonstration.

Tutorial #13 on My Youtube Channel :

In the previous post if you check you can see my tool was a cloth brush for Lava rocks. Here I have textured the beads with Epsum Salt and tooth prick. Don't worry about the salt residue. Wash well in plain water they all will dissolve well after curing.
Corals can be seen in red to peach shades, I added more yellow on one part of log made for coral but the Yellow was not enough to dominate the density of red so all appeared in same color . You will understand this while watching video.  So for more realistic organic look ; add more and more yellow to the Red and Translucent mix. Make the color gradiation.

MATERIALS REQUIRED :
After Sanding
After curing wash the beads well few times in plenty of water. Pat dry and coat all corals with BLACK acrylic paint. Wash well again and sand the beads well , The paint will stay in the groves. Buff with renaissance wax for better result. One of my viewer suggested this. I applied Minwax poly urathane only. 
Let "em Dry After Varnishing
Instead of spacer beads I used Jump rings in between, got this idea from Pinterest.
LET'S GO TO D.I.Y:
THANK YOU ALL.


Sunday, July 8, 2018

Crackled Bangle


Crackle Technique is always amazing. There are few ways to make crackle on polymer clay. Using heat gun, partially dried or cured  veneer, craft foils, African Raku by Shannon Tabor etc etc.

Here I used Black Premo Clay and Gold leaf (foil) . Those contrasted colors brings starry night effect.
You don't need much materials for this kind of bangles. Just clay, foil, wire to strengthen, bake and bond , basic tools. But needed to bake twice nearly 100 minutes i cured it in total.

Check my Tutorial๐Ÿ‘‰


Let me know your opinions... See you soon.


PATRIOTIC JEWELRY ( The US )


HAPPY JULY 4 th WEEK EVERY ONE !!!!

I would like to share some ideas and inspirations for July 4 or Patriotic day. As of now I made a video for  making a cuff bracelet and two types of Earrings.
I will be adding more DIY ideas on same theme under the playlist  " PARIOTIC JEWELRY " on my YOU TUBE  channel.
#11 Tutorial comes with a July 4 th Jewelry idea. Make yourself a cuff bracelet from polymer clay in the patriotic colors. The technique I used is TORN WATER COLOR MOSAIC , I made a SKINNER BLEND OF RED - WHITE - BLUE from Premo Sculpey brand Oven bake poly clay. Check Tutorials of Anna Oriona , Ludmila , Samantha for variations of Water color technique. This particular technique introduced by Maggie Maggio.


This extra ordinary cuff in RED BLUE WHITE and their graduated color blends will blow everyone away with the magical beauty. I bought the reusable CUFF BLANKS from eminent Clay artist Teresa Salgado. That makes making cuff bracelets so easier.

Let's Get Started :
The techniques ☝ : 
Skinner Blend
Torn Water Color Mosaic

Brand : Sculpey Premo & Fimo for Blue

Let's move on to make Ear rings


 I will show how to use Ear ring Hoops as well as Fish hook wires. These DIYs are pretty simple too. Excuse me , I shot these in night so clarity matters a bit. Actually I wanted to remind you of these are  not just about patriotic colors , you can use your artistic thoughts and color  skills in implimenting your own very way ! the beads I used for these Earrings are part of Water color cuff tutorial. If you are not able to make yourself , pick your choice of beads from stores.

Do It Yourself ๐Ÿ‘‡


Hope you Love these. I will make a necklace vedio as well by Patriotic Day. Thanks !!!! ๐Ÿ’—


Friday, June 8, 2018

2018 Summer Jewelry Ideas


3 IN 1 LARIAT V/S NECKLACE IN BOHO-CHIC STYLE

--------------------------------------------------------------------------------------------------------------------

Hello folks, does it seems crazy !!!! Yes I went mad . Initially my plan was to make a LARIAT using my Extruder as main Tool. Later I had a thought like adding one more face to that by removing the pendant. So The pendant done on reversible Method. One side would be a dome and other version is Concave. Because i added connectors the chain can be fastened on any link. If you need a chocker length,  the tail would remain long . Refer above image☝☝☝☝☝☝☝
For this, we need only few beads , the connectors will add length. I have two types of beads made with extruded strings. Both are suitable for summer. Domed Surface of pendant is also made with extruded strings. The concave is having silver finish. 

Also I would like to share with you, i am uploading my tutorials on Joann's site.
If you love to have split tutorials of this 3 in 1 project check this Link.

Under my Youtube Channel you will find whole 17 minutes video too. ↡↡↡
Hope you will try this and share with ya friends too.
Thank you all..


Wednesday, May 30, 2018

Summer Accessory Ideas 2018

Seed Bead Tassels


Do you Love some Bling for your clutch or car key or a jewelry ? Well !!!


I use this thread
Yesterday I made a small shoot of making Tassels from seed beads. Mine is not so Dense. Though you can add more strands. You can add a Tassel to your money purse , Bag , Keys etc.


Materials Needed:

Size 11\0 Seed Beads 5 colors
Thread
Needle
Scissors
Glue
Eyepin 1
Bead Cone 1


String colors alternating


Beading pattern:

I took Gold as accent color and chosen Pink, Magenta , Violet and Green as main colors.

1 ) String 10 beads of your first color. (pink)

2) 1 accent bead, 1 first color , 1 accent color.

3) 10 beads of second color. (magenta)

4) 1 accent, 1 second color, 1 accent

5) 10 beads of Third color (violet)

6) 1 accent , 1 third color, 1 accent 

7) 10 beads of Fourth color  (Green)

8) 1 accent, 1 fourth color

9) Finally String the Jingle.

10) Pass the thread back through all the beds up to top. You will get both ends of thread on our top most bead. 

11) Make as much as strands you love to have.Hold all the beaded strands together and knot them.

12) Attach to an eyepin and trim extra thread.

13) Slide a Bead Cap on Eyepin , one matching bead and form a Loop with Round nose plier. Cut off extra wire , else wrap around the bead.

14) Tassels Ready...

Let's Watch How to Make Them:

There are so many possibilities.. Think creatively..
Happy Beading!!!
See You Soon.


Wednesday, May 23, 2018

#5 Floral Earrings

How to make Fuchsia Earrings from Polymer clay


Who loves to owe seasonal theme Jewelry or flower themed jewelry? This D.I.Y Light weight Jewellery tutorial is for you. I made a pair of earrings inspired from a picture of Fuchsia blossoms shared by a Friend. I haven’t had a real flower to refer nor seen them for a while.. but the urge to create them beaten by Pinterest image search. I found a lot of variety but stick to simplest one.

What do you Need :
------------------------

NB : Bake on a Foil Cushion
Materials:

Polymer Clay 2-4 colors
Beading Wire approximately 60 cm
Seed Beads 11\0  12 count                
3mm Bicone beads 12 count
Eye pins 2
crimps 2
Ear wire 1pair
Bead Caps 2
8mm Beads 2

Tools :

Pasta Machine | Roller
Oven 
Oven Thermometer
Ball tools
Silicone Tip Tools
A surface to Roll
Aluminium Foil
Baking Tray

Please Check How to finish Them. You can either Use a Skinner Blend or a petal Cane or even Single colors.

Another Earrings from this Tutorial:

                            Thanks for Stopping by. Hope you love these for your summer.

#4 Dholki | Bicone Beads


Shaping Beads
*******************


I would like to show you , how to hand sculpt Dholki ( drum )beads using Premo polymer clay. You can use it for making necklaces, bracelets or dangles. The process is really simple.
Dholki is a kind of drum with both ends are smaller in diameter. The word Dholki originated from Marathi language.
The jewelry with Dholki beads are high in trend now in India.
Click the Blue link to Make a veneer with Clay and Foil  as shown.


Once the beads are being completed, bake them 45 minutes (Premo clay) at 275 degree farenhiet. Cool them in oven itself. Let's move to making a necklace a kinda Gothic or Victorian theme.
Follow the next video. We need seed beads of size 11\0 and 6\0 and some 3mm bicones. 


Happy Crafting.

Thank you all ...


Thursday, May 17, 2018

Jewelry Design Ideas 2018 #3


Chandbali Earrings with a Twist


Chandbali Earrings are otherwise known as INDIAN or Bollywood Earrings. Those are proud Ethnic possession of Indian Women. The word refers to Crescent Shape dangle on a stud mostly embellished with precious stones.
          This masterclass offers free instructions to make Chandbali Earrings with a twist. I used polymer clay and pigments with minimal supplies.

 Techniques described are:

1) Use of plastic Texture Mat ( fondant item)
2) Making Hollow Beads 
3) Exceptional Use of Earwires
4) Using Mica pigments 
5) Making Light weight Jewelry 
6) Forming Different Shapes From Basic Shapes
7) Sanding, Polishing 

Materials:


Polymer clay, Pigments, wires, ear hooks , sandpaper, polish 

Tools: 


Pasta machine, silicone tip tool, roller pin, texture mat, soft brush.

To buy  Silicone Tip Tools -set-of-5   <= click the blue Link.
Hope you enjoy the Exotic form of Chandbali. 

With love n regards,
Maneesha Sanoj.


2018 polymer clay Challenge - January

Week 1/52

            Mokumegane  beads on stretch cord with a silver tone store bought bead.


Week2/52

Faux Shibori pendant made from Graphite pearl Premo accents dusted with mica pigments. Beads are made of sparkling white gold glitter. Strung with seed beads of contrast color.

 Week3/52

These tube beads are made of simple jelly roll cane of black, pearl, transluscent (premo sculpey) and gold foil. Again this bracet is a stretchy one.

Week 4/52

Faux coral , amber, and turqoise are the attraction of 4 th week. Turquoise made from fimo professional and rest everything from premo sculpey only.


2 Jewelry Design Ideas for 2018


My YouTube Channel

Hi all,

 I am so happy to announce that I have created a You tube channel in which I have been showcasing My creations as well as Tutorials every week.
So since last 3 weeks I have posted Few tutorials. Please check them.

Pleas Follow this Link to visit  => =>Venera Collections You Tube Channel


Check below the videos , Lemme know your opinions and suggestions.

TUTORIAL #1 : TEXTURED TUBE BEADS BRACELET


 TUTORIAL # 2 : GEOMETRIC EAR RINGS WITH METAL FOIL & PREMO CLAY


  Thank you !!!!